Veneer made from VITA ENAMIC impresses with natural shade effects
Meeting high esthetic expectations while also completing preparation in a way that is gentle on tooth substance – that's the challenge that must be mastered when it comes to veneers. For many years, conventional glass ceramics were the preferred material for this indication. Since VITA ENAMIC has become available – a hybrid ceramic with a dual network structure – this innovative product is my material of choice.
Patient case
The 28-year-old patient presented at our practice in Langen, Germany, with an inadequate all-ceramic restoration on tooth 21 (Fig. 1). An inadequate restoration edge had already led to marginal gingivitis. Moreover, the patient was unhappy with the shape and shade of the restoration and wanted a less obvious solution to better match the shape of the adjacent tooth (tooth 11). A decision was taken to remove the existing veneer and to fabricate a new restoration using the VITA ENAMIC hybrid ceramic (VITA Zahnfabrik, Bad Säckingen, Germany).
Preparations
Shade determination was carried out using the VITA Easyshade Advance 4.0 shade-taking device (VITA Zahnfabrik, Bad Säckingen, Germany). A VITA ENAMIC blank was selected in the shade 1M1-HT. VITA ENAMIC is available in two levels of translucency, HT (HT = highly translucent) and T (T = translucent), each of which is available in the five VITA SYSTEM 3D-MASTER shades 0M1, 1M1, 1M2, 2M2 and 3M2. The manufacturer recommends the HT material variant for veneers.
As treatment progressed, the existing restoration was removed and the caries at the vestibular margin excavated (Fig. 2). Optical impression-taking was then carried out using the CEREC Omnicam from Sirona.
Virtual design
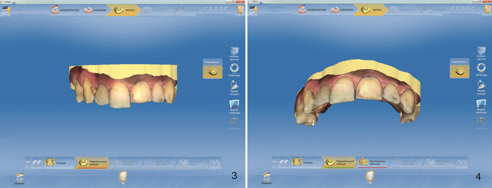
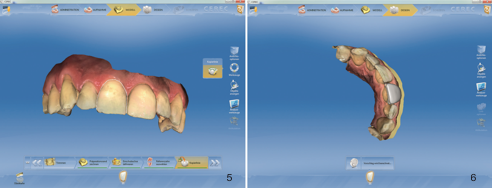
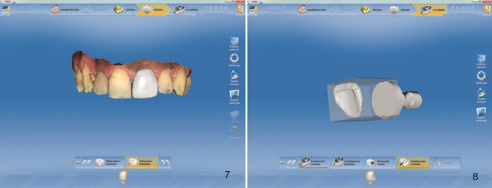
The virtual, three-dimensional model was imported and trimmed in the CEREC V 4.2 software (Sirona Dental GmbH, Wals, Austria), Fig. 3. The preparation margin was then defined on tooth 21 (Fig. 4). In order to transfer the shape of tooth 11 as desired onto the tooth to be restored, the copy line was drawn and reversed (Fig. 5). Based on the collected data, the software automatically generated a suggested design (Fig. 6 and 7). This was modified slightly at the margins before completing virtual positioning in the selected blank (block size EM-14 measuring 12 x 14 x 18 mm), Fig. 8.
Fabrication
The VITA ENAMIC veneer was then milled at normal speed using the CEREC MC XL Premium milling unit. According to the information provided by the manufacturer, VITA ENAMIC also supports fast milling mode. Due to its special structure comprised of a ceramic and polymer network, machining the material results in less milling tool wear than in the case of other CAD/CAM ceramics. Other benefits include that the material can be milled more thinly, particularly in edge areas, without any fractures at the margins. This reduces the workload during finishing.
Finishing and placement
Removal of the sprue was then followed by try-in of the veneer in the patient's mouth (Fig. 9). To create a surface texture, the VITA ENAMIC Polishing Set clinical was used. In order to replicate the adjacent tooth, only the incisal edge and the surface were made a little less even. High-gloss polishing then followed. Glazing can be performed using light-curing stains. Different to other ceramics a firing is not required at all with VITA ENAMIC.
Thanks to the natural shade effect of the hybrid ceramic veneer, the patient was immediately delighted. Figure 10 shows the result. The natural translucence along the incisal edge was possible because the material can be milled to create a very thin layer. The wall thickness in the marginal area can be reduced to 0.2 mm. Before final cementation was carried out, the shade effect was evaluated using try-in pastes from the Variolink Veneer cementation system (Ivoclar Vivadent, Schaan, Liechtenstein). Placement was then carried out in a relatively dry environment using Variolink Veneer in the shade HV+1.
For daily use
VITA ENAMIC has proven itself to be an innovative material in our practice. It is often used instead of silicate and oxide ceramics. This is due on the one hand to the effective processing that it supports. However, the hybrid material can also be milled to a very thin layer. This allows us to carry out preparation in a manner that is gentle on tooth substance and thus remain true to our philosophy of retaining as much healthy tooth substance as possible. Many patients also report that the restoration feels comfortable in their mouths, in a similar way to natural dentition.


