Dental Visionist
  • de
  • en
  • fr
  • it
  • es
current
  • 2.8
  • 1.8
  • 2.7
  • 1.7
  • 2.6
  • 1.6
  • 1.5
  • 1.4
  • News
back to overview

Minimally invasive veneer restoration with hybrid ceramics

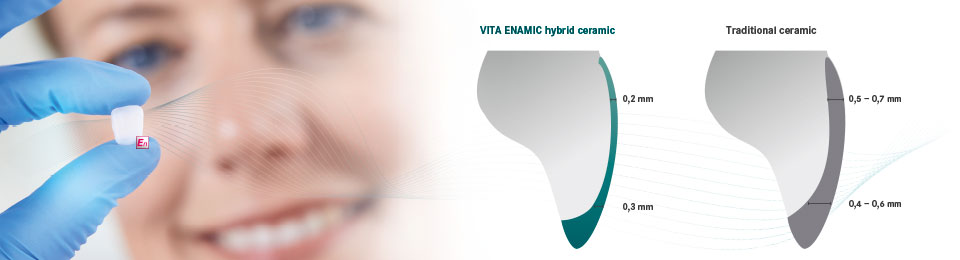
Esthetic corrections with veneers should be minimally invasive and limited to the enamel and, despite the thin layer thickness in the mouth, develop a natural play of shade and light. The multichromatic CAD/CAM hybrid ceramic blank VITA ENAMIC multiColor (VITA Zahnfabrik, Bad Säckingen, Germany) has an integrated shade and translucency gradient with six finely graduated layers. The natural appearance of the tooth can be reconstructed almost at the touch of a button. Characterization with stains can usually be omitted. The dual ceramic-polymer network structure of the hybrid ceramic allows narrow wall thicknesses of up to 0.2 millimeters, while remaining very edge-stable. These are the best conditions for restoring two upper middle incisors, as Dr. Andreas Kurbad (Viersen, Germany) shows in this case report.

1. The esthetic challenge

A 45-year-old female patient presented in the office and was dissatisfied with the esthetic effect of her front teeth. The middle incisors had presumably lost incisal edge contour and length, due to abrasive and erosive processes. In addition, the anterior teeth were clearly discolored. The patient wished to restore a natural appearance to these teeth using minimally-invasive therapy. For targeted therapy, the situation was scanned with the CEREC Omnicam (Dentsply Sirona, Bensheim, Germany), and photos were taken of the situation. The software Smile Designer Pro (Tasty Tech, Toronto, Canada) simulated the extension of the incisal edge and the recontouring of the morphology. On this basis, a clinical mock-up was created which satisfied all participants.

2. CAD/CAM-supported fabrication

The mock-up was scanned intraorally to be included in the virtual design in the CEREC software as a biogeneric copy. Due to the vestibular loss of substance on teeth 11 and 21, the preparation was performed in a very minimally invasive manner with a micro chamfer, applied in the cervical area. The clinical situation was now rescanned so that the virtual construction of the veneers and their CAD/CAM-based fabrication could take place. When working with rotating diamond tools, the focus was mainly on the surface texture. Finally, the veneers were polished to a high gloss and were incorporated in the same session.

3. Seating and final results

After clinical try-in, the two restorations were fully adhesively incorporated. The dominant feldspar ceramic network (86 wt%) of the hybrid ceramic veneer was etched in a proven manner with hydrofluoric acid and then silanized. The conditioning of the enamel was carried out with phosphoric acid and a light-curing singlecomponent adhesive. After incorporation with a shade-matched composite cement, the hybrid ceramic veneers fit harmoniously into the esthetic zone. Thanks to the rapid production without any crystallization or sintering firing and the integrated shade gradient, the two central incisors could be efficiently and esthetically restored. The patient was highly satisfied with the minimally invasive and fast result.

Report 07/18

Dr. Andreas Kurbad
Viersen, Germany
"With VITA ENAMIC multiColor, the natural appearance of a tooth can virtually be reconstructed at the push of a button."
Dr. Andreas Kurbad
Viersen, Germany
Fig. 1: Initial situation: Erosion and abrasion led to a shortened incisor and the loss of the morphology of teeth 11 and 21.

Fig. 1: Initial situation: Erosion and abrasion led to a shortened incisor and the loss of the morphology of teeth 11 and 21.

Fig. 2: With the software Smile Designer Pro, ideal middle incisors were constructively simulated.

Fig. 2: With the software Smile Designer Pro, ideal middle incisors were constructively simulated.

Fig. 3: With a transparent silicone key and light-curing composite, the mock-up was fabricated intraorally.

Fig. 3: With a transparent silicone key and light-curing composite, the mock-up was fabricated intraorally.

Fig. 4: The mock-up corresponded to the esthetic expectations of the patient.

Fig. 4: The mock-up corresponded to the esthetic expectations of the patient.

Fig. 5: The minimally invasive preparation during the application of a micro chamfer in the cervical area.

Fig. 5: The minimally invasive preparation during the application of a micro chamfer in the cervical area.

Fig. 6: The clinical situation was scanned with the CEREC Omnicam.

Fig. 6: The clinical situation was scanned with the CEREC Omnicam.

Fig. 7: The design of the hybrid ceramic veneer in the CEREC software.

Fig. 7: The design of the hybrid ceramic veneer in the CEREC software.

Fig. 8: With the CEREC-Smile Design Application, the restorations can be evaluated together with the lips.

Fig. 8: With the CEREC-Smile Design Application, the restorations can be evaluated together with the lips.

Fig. 9: The sheer veneers made of VITA ENAMIC multiColor immediately after grinding out.

Fig. 9: The sheer veneers made of VITA ENAMIC multiColor immediately after grinding out.

Fig. 10: The incorporation of texture and morphology with the rotating diamond tool.

Fig. 10: The incorporation of texture and morphology with the rotating diamond tool.

Fig. 11: A simple high-gloss polish was enough to finish the restorations.

Fig. 11: A simple high-gloss polish was enough to finish the restorations.

Fig. 12: The finished veneers just before the clinical try-in.

Fig. 12: The finished veneers just before the clinical try-in.

Fig. 13: Conditioning with hydrofluoric acid creates a micro-retentive surface.

Fig. 13: Conditioning with hydrofluoric acid creates a micro-retentive surface.

Fig. 14: A light-curing one-component adhesive was applied to the tooth surfaces.

Fig. 14: A light-curing one-component adhesive was applied to the tooth surfaces.

Fig. 15: Both veneers integrated completely and naturally into the esthetic zone.

Fig. 15: Both veneers integrated completely and naturally into the esthetic zone.

Fig. 16: Result: The curve of the incisal edges harmonized with the curve of the lips.

Fig. 16: Result: The curve of the incisal edges harmonized with the curve of the lips.

back to overview
  • Contact VITA
  • Downloads
  • Imprint/Information
  • Privacy Policy