VITA VM LC flow: Artful and multi-facetted individualization with composite
VITA ENAMIC can be customized with VITA VM LC flow (VITA Zahnfabrik, Bad Säckingen, Germany) for esthetic reconstruction in the front. Urszula Mlynarska, Master Dental Technician (Warsaw, Poland), describes the entire process of a crown restoration of teeth 11 and 12 in her case report, starting with planning, followed by wax-up and cut-back, then individualization. In addition, the author explains how natural, multi-faceted results can be achieved with the veneer composite.
1. Status following trauma
The female patient, who is now 23 years old, originally had a bicycle accident at the age of 16. The result was a traumatic crown fracture on 11 and 21 without involvement of the pulpa and dislocation. The vital teeth were restored immediately with composite. However, the reconstruction did not allow long-term stability or a natural appearance, which the patient did not like. It was her desire to have the incisors restored in a highly esthetic and stable manner. In order to restore them as desired, VITA ENAMIC in combination with VITA VM LC flow were selected as the restoration materials.
2. Shade determination, preparation, and crown fabrication
The visual tooth shade determination was done with the VITA linear guide 3D MASTER. The result was checked with VITA Easyshade V. A VITA ENAMIC blank in the shade 1M2-HT was selected. A wax-up on a situation model helped to define the final treatment result. Preparation and impression followed. The produced master model was scanned with the aid of the 3Shape D850 (3Shape A/S, Copenhagen, Denmark). A fully anatomically crown was then digitally constructed and milled. After the try-in, a cutback was conducted incisally and centrally.
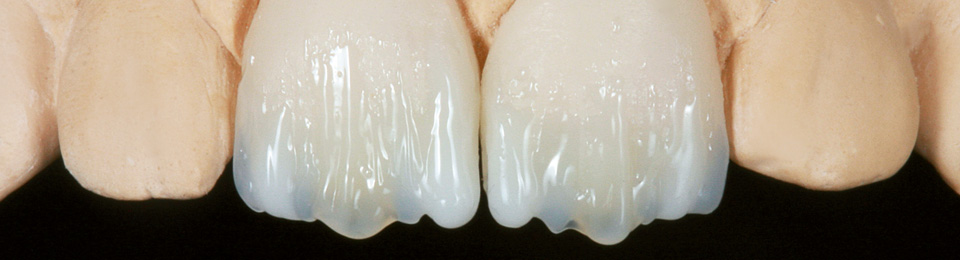
3. Individualization of the reduced crowns
"I then used VITA VM LC flow for individualization. The flowable veneer composite stays exactly where I have applied it. This makes it simple to maintain control during the veneering," reports Urszula Mlynarska. Thanks to the warm basic color of the hybrid ceramic, a combination of warm and cold shades could be used. In order to create a three-dimensional effect, the dental technician recommends the interplay of opaque and translucent layers. Urszula Mlynarska's summary of the veneering composite: "Millions of combinations are possible. We are only limited by our imagination."
4. Elaboration and bonding
After the final polymerization of the veneer, the morphology and texture of the surface were shaped with fine-grain diamond tools. To obtain natural reflections, the final polishing was done with a cotton buff and diamond polishing paste. For a reliable adhesive bond, the lumen of the crowns was etched with 5% hydrofluoric acid and then silanized. The end result shows a highly esthetic restoration which integrates perfectly with the juvenile neighbors teeth. The young patient was very satisfied with the "invisible" reconstruction.
Report 08/16


.")
.")

